29 Washi Tape Wall Decor Ideas for a Rental
Washi tape might be the most renter-friendly decorating tool I have ever actually used. It is paper tape with a light grip, it comes in more colors and patterns than any normal person needs, and it peels off without a drill, a nail, or a panicked text to your landlord. I first tried it in a studio where the walls were a flat, tired white and the lease said, in very clear language, no holes. A roll of sage green tape and a stack of small prints changed that room in an afternoon, and I got my full deposit back when I left.
That is the promise here, with one honest catch. Washi tape is low-tack, not magic. It can pull paint if the paint is fresh, cheap, or already peeling, and it does not love textured wallpaper or steamy bathrooms. Test a hidden spot first, peel slowly at a shallow angle, and check your lease before you cover a whole wall. Do that, and these 29 washi tape wall decor rental ideas will let you try color, pattern, and personality without committing to any of it.
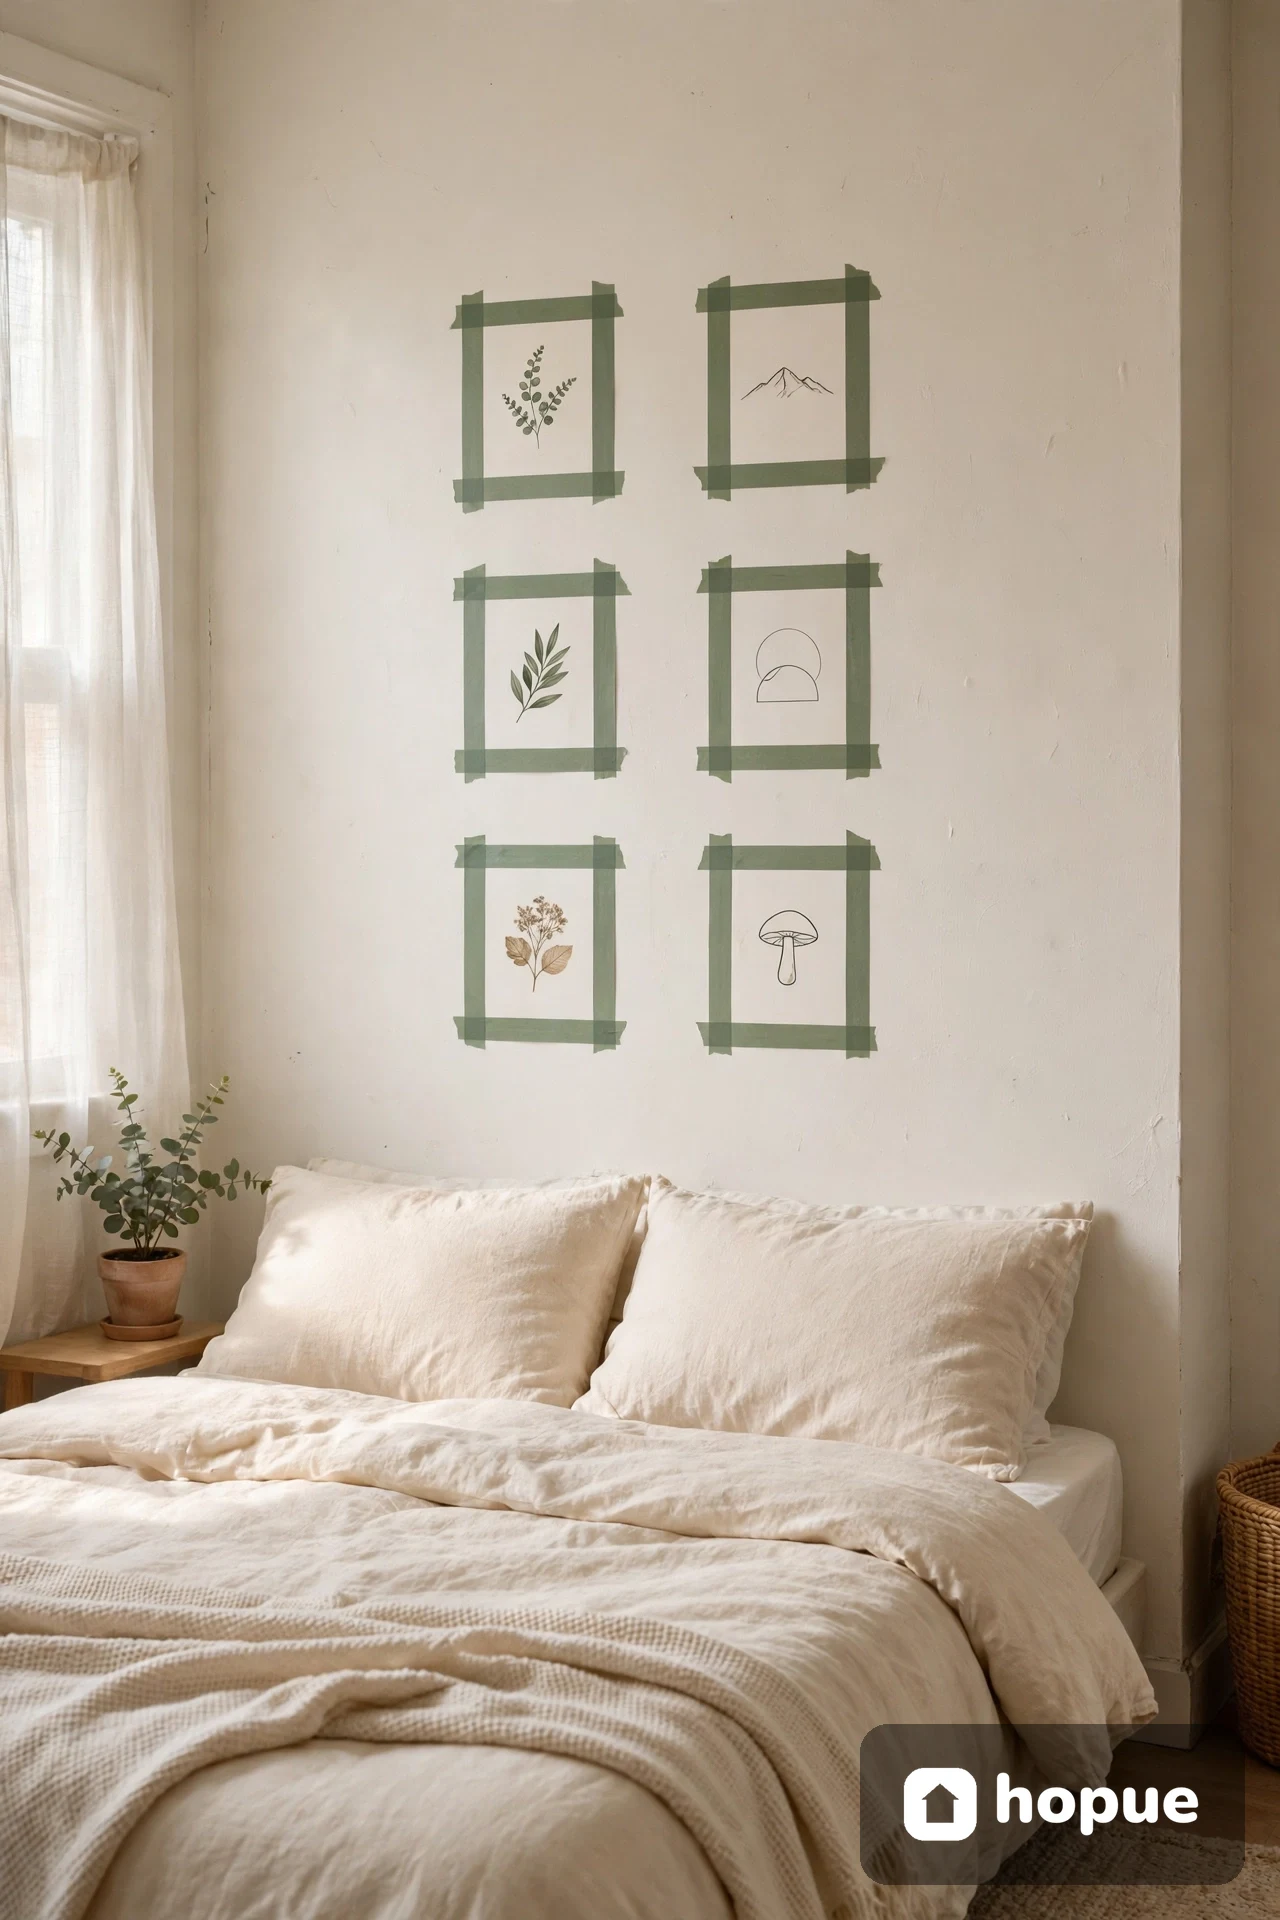
1. Tape Frames Around Small Prints
Start with the classic. Pick four to six small prints, postcards, or photos you already own, and build a frame for each one straight on the wall with tape. Leave a small gap between the print and the tape so it reads like a real frame, not like you just stuck paper up. I like one color for the whole set. It pulls mismatched art together fast.
My first attempt looked crooked because I eyeballed it. Use a level app on your phone, or just step back after the first two. A frame that slid down overnight taught me to press the tape down firmly, especially at the corners, and to avoid putting frames right above a radiator where warm air loosens the edges.
2. One Oversized Frame for a Poster
A single big poster can look lost on a blank wall. Give it a wide tape border instead, much wider than you think you need, and suddenly it looks intentional, like a gallery piece. Two strips of tape side by side make the border feel thicker and more finished.
This works best with a poster you love but do not want to frame properly yet. I did it with a market print in a rental kitchen, in a rust color that matched a dish towel. Visitors kept asking where I bought the frame. The answer was a roll of tape and ten minutes, and I took it down in two minutes when I moved.
3. A Photo Grid Held Up by Tape Corners
Forget a perfect grid for a second. Lay your photos on the floor first, shuffle them until the mix of faces, places, and colors feels right, then tape just the top corners on the wall. Little tape tabs at the corners look casual and honest, like a wall that grew over time.
Leave uneven gaps on purpose. Perfect spacing can look stiff, and real photo walls are rarely perfect. If a photo keeps curling, add a tiny piece of tape at the bottom center on the back. And keep the grid away from the spot where your bag brushes the wall every day. That daily bump is what knocks photos loose.
4. Tape-Only Abstract Art
You do not need art to hang art. Use tape itself as the drawing. Long diagonal lines, a big circle made from short curved pieces, or a cluster of overlapping rectangles in three colors can fill a blank wall above a sofa. Step back often. What looks random up close usually finds its shape from the doorway.
This is the idea to try if you are nervous about color. Tape is cheap to redo, and a line you hate peels off in seconds. I once built a whole diagonal pattern, hated it from the couch, and had a completely different version up before dinner. No holes, no patching, no regret. That freedom is the whole point.
5. A Horizontal Stripe Band
One wide horizontal band of tape, running across a wall at about picture height, can break up a long white room without painting anything. Use two or three colors in stripes inside the band, or one solid color for a calmer look. Keep the line level. A drooping stripe is all anyone will see.
In a narrow living room, a horizontal band made the room feel wider to me, or at least less like a hallway with a couch in it. It also gives you a natural line to hang small things from later. Just do not run it straight through a light switch. Stop the tape, go around, and start again on the other side.
6. Vertical Color Blocks Behind a Sofa
Vertical blocks work the opposite way. Tall rectangles of tape in different colors, side by side behind a sofa or a desk, give a plain wall some height and rhythm. Vary the widths. A wall of identical rectangles can look like a spreadsheet. One wider block, one narrow one, then a medium one feels more like a person chose it.
Pick colors you already have in cushions or a throw, not colors from a trend post. I learned that the hard way with a mustard block that clashed with everything else I owned. When the blocks matched the room I already lived in, the wall stopped looking like a craft project and started looking like part of the furniture.
7. A Tape Arch Over a Bed or Chair
Arches are everywhere right now, and tape makes one without paint. Build the curve from short overlapping pieces, working from the top down, and fill the shape with stripes or leave it as an outline. An outline alone is softer and easier to get right. A filled arch makes more of a statement, but every wobble shows.
Try it over a reading chair first if a bed feels like too much commitment. A renter I know put a small terracotta arch over her armchair, added a floor lamp, and that corner became the only spot in her flat anyone wanted to sit in. If the curve goes wrong, peel the top pieces and try again. Nobody will know.
8. A Faux Headboard
No headboard? Tape one. Outline a rectangle or an arch behind the bed, tall enough to read as furniture, and add a second, thinner outline inside it for detail. Keep the bottom edge hidden behind pillows. That trick hides a slightly uneven bottom line and makes the whole thing look finished.
This saved me in a rental where the bed frame was just metal rails and a mattress. The tape headboard, in a deep green, gave the bed a presence it did not have before. One warning from experience: do not tape over the spot where your head actually rests against the wall. Pillows shift, tape lifts, and you will wake up stuck to a strip of it.
9. A Diamond or Lattice Pattern
If you like pattern but fear wallpaper, try a diamond lattice. Tape diagonal lines in both directions until diamonds appear, then leave some diamonds empty and fill a few with a second color. It looks complicated. It is mostly just patience and a level line to start from.
Start in the middle of the wall and work outward, not from a corner. Corners in rentals are rarely square, and starting there will throw the whole pattern off. I marked my starting lines lightly in pencil first, very faint, on a spot the tape would cover. The pencil marks wiped off later. The pattern stayed up for a year.
10. Dots and Confetti
Dots are the lowest-effort pattern with the highest payoff. Cut or tear short pieces of tape, fold them into small circles or squares, and scatter them across a wall in two or three colors. Cluster them tighter in one corner and sparser as they spread out. That fade is what makes it look designed instead of random.
This is a good one for a wall you see when you walk in. A friend did gold and cream dots in her entryway, and guests always touched the wall to check if the dots were painted on. Keep the dots off textured paint, though. Tape circles lift at the edges on bumpy surfaces, and you will spend your life pressing them back down.
11. A Border Along the Top of the Wall
A tape border near the ceiling sounds old-fashioned until you see it done simply. One clean line of tape, a hand’s width below the ceiling, in a color that echoes your bedding or curtains, frames the whole room. Add a second, thinner line below it if you want more detail.
The trick is the corners. Go slowly, overlap the pieces slightly, and press them flat. My first border bubbled at every corner because I tried to bend one long strip around the turn. Short pieces, overlapped, sit flat and look neater. And check the top edge from a step stool before you call it done. Ceilings hide a lot of sins from floor level.
12. A Half-Wall Band Like Painted Wainscoting
Painted wainscoting is a big job. A tape band is not. Run a horizontal line partway up the wall, fill everything below it with vertical tape stripes or a solid color, and leave the top white. It gives a dining corner or a hallway a finished, almost built-in feeling.
This works especially well behind a small dining table. The band reads as a backdrop, so the table and chairs look placed, not just pushed against a wall. Use a color you can live with at mealtimes, every day. I picked a dusty blue and never got tired of it. A brighter color might have been fun for a week and annoying by month two.
13. A Tape Outline Around a Door
Doors in rentals are usually plain, and the wall around them is wasted space. Outline the door frame with tape, following the trim, in a color that stands out against the wall. It turns an ordinary doorway into a feature, and it costs almost nothing.
I did this in a hallway that had no art and no furniture, just doors. A black tape outline around the bedroom door, plus a small print beside it, made the hallway feel like it belonged to the rest of the flat. Keep the tape off the door itself if the door gets slammed a lot. Tape on a moving door edge peels fast, and the sticky edge collects dust.
14. A Frame Around a Mirror
Mirrors need no nails if you frame them with tape. Outline a plain wall mirror, or a cheap leaning mirror, with a bold tape border, and add corner accents in a second color. The tape draws the eye to the mirror and makes a basic mirror look chosen rather than leftover.
Watch the bathroom mirror idea, though. Steam is washi tape’s enemy, and a mirror in a steamy bathroom will shed its frame. In a bedroom or entryway, it holds well. Mine stayed up through a whole winter in an entryway, right where coats brushed past it, because I pressed the corners down hard and kept the tape off the glass itself.
15. A Calendar Wall You Can Actually Change
A tape calendar on the wall is part planner, part decor. Tape a grid for the month, write dates on small paper squares inside each box, and swap the squares as the month changes. Use one color for the grid and another for birthdays, deadlines, or days off.
I used one in a kitchen, next to the fridge, and it beat every phone calendar for one reason: I saw it while making coffee. No app to open, no notification to dismiss. Keep it somewhere you stand still for a minute each day. A calendar in a hallway you rush through is just decoration. A calendar by the kettle gets used.
16. A Weekly Planner and Command Center
A monthly calendar is for dates. A weekly planner is for life. Tape seven columns, one for each day, on a wall near where you drop your keys, and use sticky notes inside the columns for meals, errands, and reminders. When the week ends, peel the notes off and start again. The tape grid stays.
This is the version that survived in my flat after the monthly calendar came down. The week view matched how I actually thought about my days. Add a small strip at the bottom for a shopping list, and keep a pen on a hook nearby. If there is no pen within reach, the planner becomes wall art, and wall art does not remind you to buy milk.
17. Tape Labels and Captions Under Your Art
Small tape labels under prints and photos give a gallery wall a personal, slightly museum-like feel, without any of the stiffness. Write the caption on a small piece of card, tape it below the art with a strip of colored tape, and change it whenever you like. A date, a place, a joke only you get. Whatever makes the picture yours.
I captioned a photo from a seaside trip with just the town name and the year, and it made the whole wall feel more considered. The labels also help when your art is a mix of styles that do not obviously belong together. A row of neat little captions ties them into one story, even if the pictures themselves have nothing in common.
18. Tape as a Mat That Extends the Artwork
Here is a quieter trick. Instead of framing a print, tape a border that picks up a color or a line from inside the picture and lets it run past the edge of the paper. A blue stripe in a seascape continues onto the wall. A green shape in a plant print grows a tape stem. The art and the wall start talking to each other.
This takes a bit of looking before you stick anything down. Hold the tape up, step back, and see if the extension feels natural or forced. I tried it with a print of hills and got the line wrong twice before it clicked. When it clicked, the print looked twice as big, and I had not bought anything new. That is a good renter’s win.
19. A Guiding Stripe Down a Hallway
Long hallways in rentals can feel like dead space. A single tape stripe running along one wall, at handrail height or just above the skirting, gives the hallway direction and a reason to look at it. Hang small photos or postcards along the stripe, evenly spaced, and the hallway becomes a gallery you walk through.
Keep the stripe on one wall only. Two stripes facing each other can feel like a tunnel. One stripe, with breathing room above and below it, feels calm. And measure from the floor, not from the ceiling, because rental ceilings slope more than you expect. A stripe that follows the floor looks level to the eye, even if a spirit level disagrees.
20. Tape Edges on Stair Risers
If you have stairs, even a short flight, the risers are a perfect tape canvas. Run a strip of tape along the top edge of each riser, or fill alternate risers with a pattern, and the stairs stop being purely functional. Use a sturdy tape and press it down well. Feet catch edges.
This is one place to be practical first and decorative second. I taped the risers in a shared house once, and the pattern lasted because I kept the tape flat against the vertical face, where shoes do not scuff it. Tape on the tread itself, where feet land, will peel and look tired within days. Vertical faces only. Your future self, carrying laundry downstairs, will thank you.
21. A Tape Road and Town for a Kids’ Room
A tape road on the wall, winding around corners and past tape houses, trees, and a roundabout, turns a bedroom wall into a play space. Use black or dark tape for the road, add dashed white center lines from tiny tape pieces, and let your child help place the houses. The wall becomes part of the toys, not just a backdrop for them.
Keep the road at toy-car height, low on the wall, so small hands can actually drive along it. I watched a nephew spend an entire rainy afternoon driving cars up a taped road and parking them in taped garages, and nothing on that wall cost more than a few rolls of tape. When he outgrew it, the whole town peeled off in one evening, paint intact.
22. A Growth Chart and Shape Wall
A tape growth chart is the renter’s answer to pencil marks on a doorframe. Tape a vertical line on the wall, add small horizontal marks and dates on paper tags, and watch the chart grow with your child. No marks on the woodwork, no argument at move-out, and you can take the chart with you if you peel it carefully.
Pair it with tape shapes nearby: stars, hearts, or simple animals made from overlapping strips. The shapes give the wall a playful feel even before the first measurement goes up. Write the dates in pencil on the tags, not pen, so a smudge does not ruin a tag you want to keep. Years from now, those little tags will matter more than the tape ever did.
23. A Reading Nook Outline
A reading corner needs a sense of enclosure, and tape can draw it. Outline a house shape, a tent, or a simple arch on the wall behind a cushion pile or a small chair, then add a tape shelf line for books and a hanging paper star or two. The outline tells a child, this spot is for reading, and children take that seriously.
Keep the outline big enough to sit inside, not just look at. A tiny outline above a cushion looks like decoration. A big outline that wraps around the cushions feels like a den. I helped a friend do this in a corner of a living room, and her daughter claimed it within minutes and refused to read anywhere else for months. That is the test. If the child claims it, it worked.
24. Seasonal Swaps Without New Art
Seasonal decorating in a rental often means buying things you have nowhere to store. Tape lets you swap the season instead. Keep your prints up, but change the tape frames: warm rust and mustard in autumn, deep green and red at Christmas, pale pink and sage in spring. Same art, different mood, no storage needed.
I keep a small box with four rolls, one for each season, and swapping the frames takes less time than putting up a string of lights. The trick is to change all the frames in one room at once. One autumn frame among summer ones looks like a mistake. A whole room in autumn colors looks like you meant it, and you did.
25. A Tape Christmas Tree Outline
A full Christmas tree does not fit every small flat. A tape tree does. Outline a large triangle on the wall, add horizontal tape branches, and hang lightweight paper ornaments from tiny tape loops, or just stick paper stars and circles straight onto the tree. No needles on the floor, no tree to carry up three flights of stairs.
Put it where you would actually sit and look at it, not in a corner you never use. Mine went on the living room wall opposite the sofa, and it held paper ornaments all December. Use lightweight decorations only. Anything heavy will drag the tape down, and a sagging tape tree at a holiday party is not the festive look anyone is going for.
26. Tape Edges on Furniture and Shelves
Tape is not just for walls. Run a strip along the front edge of a shelf, a dresser drawer, or a plain bookcase, and a tired piece of furniture gets a new edge. It is especially good on white flat-pack furniture, where a colored edge breaks up all that blank surface and hides small chips and scuffs.
Test this on a hidden edge first, because tape on laminate and varnish can behave differently from tape on paint. I edged a white shelf unit in sage green, and it looked custom until the day I moved, when it peeled off cleanly and the shelf looked new again. Avoid the edges you grip every day, like drawer pulls. Hands and tape are not friends over time.
27. Framed Light Switches and Outlets
Light switches are small, but they are everywhere, and a neat tape frame around a switch plate can tie a room together. Use a thin strip, keep it flat against the wall around the plate, and never tape over the switch itself or inside the plate. The switch has to move freely, and tape in the mechanism is a bad idea.
I framed the switches in a hallway with the same color as the tape frames on the art nearby, and the hallway suddenly looked planned instead of accidental. Keep this one subtle. A loud pattern around every switch in a room will fight with everything else on the wall. One color, thin strips, and only in rooms where it echoes something else.
28. A Tape-Backed Bookshelf Display
Open shelves can look messy even when they are tidy. Tape a panel on the wall behind the shelf, in a color that makes your books and objects stand out, and the shelf gains a backdrop. Add small tape labels under each shelf section if you like order: cookbooks here, novels there, the plant that refuses to die over there.
The backdrop works because it gives the eye a boundary. Without it, books and objects blend into the wall. With it, each shelf reads as its own little display. I did this behind a narrow shelf in a kitchen, in a warm cream tape, and the jars and cookbooks on it finally looked like they belonged together instead of just stored there.
29. A Removable Mood Board and Color Test Wall
Before you commit to a paint color you are allowed to use, or a rug you are thinking of buying, test it with tape. Build a mood board straight on the wall: tape up fabric swatches, paint chips, postcards, and photos, outline the whole board in tape, and live with it for a while. You will learn more in a week of glancing at it than in an hour of scrolling.
This is also the safest first tape project if you have never used washi tape on your walls. Pick a small, hidden wall, try your tape there, leave it up, and check it after a few days. If it peels cleanly and the paint is fine, you have your answer. If it lifts paint, you have learned it on a spot nobody sees, and your move-out check will go much more smoothly for it.
A roll of tape will not fix a bad layout or a room with no light, and it was never meant to. What it does, quietly and cheaply, is let you try things. Try the frame, try the arch, try the color you are not sure about. If it works, it stays. If it does not, it peels off, and you try something else. For a renter, that freedom to experiment without damage is worth more than any single finished wall.
Frequently Asked Questions
Will washi tape peel the paint off my rental walls?
It can, but it usually does not if you use it carefully. Washi tape is low-tack paper tape, made to come off more easily than masking tape or packing tape. The risk goes up on fresh paint, cheap flat paint, paint that is already peeling, and textured wallpaper. Always test a hidden spot first, leave it for a few days if you can, and peel it slowly at a shallow angle when you remove it. If paint comes up in your test spot, do not cover a whole wall with that tape. Try a different brand, or use tape only on glass, mirrors, and furniture edges instead, and check your lease for what your landlord expects at move-out.
How long will washi tape stay up on a wall?
In a dry room, away from direct sun and heat, a well-pressed strip can stay up for months. Heat from a radiator, steam from a shower, and strong sun through a window all shorten that, because warmth and moisture loosen the light adhesive and can make edges curl. Press the tape down firmly when you put it up, especially at corners and ends, and check it now and then. If an edge starts to lift, press it back down or replace that strip rather than leaving it to collect dust. A strip that has been up a long time may leave a faint mark or feel stickier when you peel it, so do not leave tape up far past the point where you still like how it looks.
Can I use washi tape in a bathroom or a humid room?
It is not the best choice for a steamy bathroom. Humidity softens the adhesive, edges curl, and tape near a shower or above a steaming bath will usually come down sooner than you want. If you still want tape in a bathroom, keep it well away from the shower, the bath, and the mirror you use after a hot shower, and choose a room with a fan or a window you actually open. A powder room that rarely steams up is a safer bet than a small bathroom with no ventilation. For a steamy bathroom, tape on a mirror frame or a cabinet door will still struggle, so save your favorite patterns for drier rooms.
Can I reuse washi tape, and what surfaces should I avoid?
You can sometimes reuse a strip once, if it comes off cleanly and still feels tacky, but it will never grip as well the second time. Long strips, strips that have been up for months, and strips that picked up dust will usually not stick well again, so keep reuse for short pieces and small fixes. Avoid textured wallpaper, fresh paint that has not fully cured, flaking or chalky paint, brick, and very rough plaster, because tape will not sit flat and may pull loose material off when you remove it. It also struggles on dusty or greasy surfaces, so wipe the wall clean and let it dry before you start. When you remove tape, peel slowly at a shallow angle, and if any residue remains, roll it off gently with your fingers or a fresh piece of tape rather than scrubbing the wall.